

Use This 7-Slide Listing Presentation Format to Win More Sellers
Use This 7-Slide Listing Presentation Format to Win More Sellers

Use a tight seven-slide listing presentation that leads with comps and a concrete marketing plan, not a slide about your license history. The structure: cover, about you, your home, pricing strategy with a comps table, marketing plan, timeline, and a close slide that assumes the yes. This order works because it puts the seller’s two biggest questions, “what’s it worth” and “how will you sell it,” in the first half of the meeting instead of burying them under agent biography.
You don’t need to build this from scratch. Grab an editable template in PowerPoint or Canva, drop in the property’s photos and numbers, and you have a working deck in under an hour.
- Cover: property photo, one-line positioning statement, your contact info
- About you: two or three credibility points, kept brief
- Your home: buyer-facing features, not just MLS specs
- Pricing/CMA: three to five sold comps, one to two actives
- Marketing plan: specific tactics, not vague promises
- Timeline: week-by-week milestones to closing
- Next steps: the assumptive close
Statistic callout: Nearly 95% of buyers search for homes online at some point in their search, so the marketing slide needs to name actual channels, professional photography, targeted social ads, a custom property site, not a generic “I’ll market your home everywhere” line.
Key Takeaways
A seven-slide, comps-led listing presentation built around a real marketing plan and an assumptive close consistently outperforms longer, agent-centered decks.
| Point | Details |
|---|---|
| Use the 7-slide structure | Cover, about you, your home, pricing/CMA, marketing, timeline, and close, in that order. |
| Show 3 to 5 sold comps | Pair them with 1 to 2 active listings so sellers can see their real competition. |
| Name specific marketing tactics | Reference professional photography, social ads, and a property site instead of vague promises. |
| Rehearse before every appointment | A timed run-through improves delivery and keeps the meeting within the seller’s attention span. |
| Generate compliant copy once | Tools like AgentWrite create Fair Housing checked copy you can reuse across slides and marketing channels. |
Table of Contents
- Listing Presentation Examples Worth Copying
- The 7-Slide Blueprint: What Goes on Every Slide
- How to Prepare for and Run the Appointment
- Customizing Templates Without Breaking Fair Housing Rules
- How AgentWrite Speeds Up Your Listing Prep
- The Mistakes That Cost Agents the Listing
- Using Tablets, Video, and Virtual Tours in Your Pitch
- What Actually Wins Listings
- Sources
- FAQ
Listing Presentation Examples Worth Copying
Not every seller needs the same deck. A $2 million lakefront listing and a starter condo facing a slow spring market call for different tones, different slide counts, and different levels of polish. Here are five formats worth having ready in your toolkit.
- The 7-slide kitchen-table deck. Best for typical single-family listings and first-time seller consultations. Keep bullets short, use one comp table, and print two copies for an in-home meeting. Customization tip: swap the cover photo for a twilight exterior shot if you have one; it outperforms daytime shots on emotional appeal.
- The luxury bespoke deck. Best for listings above your market’s median price where sellers expect a more editorial feel. Add a dedicated lifestyle slide (nearby amenities, architectural pedigree) and drop the generic stock icons for custom photography throughout. Customization tip: use a single accent color tied to the property’s finishes rather than your brand palette.
- The digital-first deck with a property microsite. Best for tech-comfortable sellers or listings you’ll market heavily online. Replace the static marketing slide with a QR code linking to a live property website, and show a screenshot of the site’s traffic dashboard once it’s live. Build the microsite before the appointment so you can demo it, not just describe it.
- The expired-listing recovery deck. Best for sellers whose home didn’t sell with a previous agent. Add a “what went wrong, what changes now” slide comparing the old marketing plan to yours, and move pricing strategy earlier since these sellers are usually skeptical about valuation. Customization tip: reference the specific number of days their old listing sat, then show your median days-on-market by comparison.
- The neighborhood-specialist compact deck. Best for hyper-local farming areas where you’ve sold multiple homes nearby. Cut the “about you” slide to a single line and expand the comps slide with a small map showing your recent sales pins. Customization tip: lean on local sales volume instead of general credentials, sellers in your farm area already recognize your name.
Offer each style in three formats: a PPTX for agents who like to tweak layouts, a Canva link for quick color and photo swaps, and a PDF for the leave-behind. PDFs render consistently on any device, but they’re harder to edit live if a seller asks a question mid-meeting, so keep the source file open on your tablet as backup.
For pacing, budget your 20 to 30 minute appointment like this: 30 seconds on the cover, one minute on your background, three minutes on the home’s features, seven to eight minutes on pricing and comps (the slide sellers scrutinize hardest), five minutes on marketing, two minutes on timeline, and the remainder on questions and the close.
The 7-Slide Blueprint: What Goes on Every Slide
Here’s exactly what to put on each slide, written so you can fill in the blanks with your own property data.
Slide 1, Cover. One hero photo (exterior, ideally twilight or golden hour), a single positioning sentence like “A move-in-ready craftsman minutes from downtown,” and your name, phone, and headshot in a corner. Visual tip: keep text under 15 words so the photo does the talking.
Slide 2, About you. Two or three credibility bullets (years active, transaction volume, relevant certification), one recent result stated in a single line (“Sold 12 homes in this ZIP code in the past year”), and a short testimonial pull-quote if you have one.
Slide 3, Your home. Four buyer-facing feature bullets translated into benefits, not specs, plus one comparative angle showing what buyers in this price range actually prioritize (updated kitchen, walkable location, school ratings).
Slide 4, Pricing and CMA. This is where most presentations lose sellers with a wall of numbers. Select three to five closed comps and one or two active competitors, then present them in a simple table:
Pro Tip: Instead of one price recommendation, show three pricing scenarios side by side, above-market, at-market, and a tactical price designed to spark multiple offers. Sellers process visual comparisons faster than a single spreadsheet number, and it opens a real conversation about strategy instead of a negotiation over your judgment.
Slide 5, Marketing plan. List specific tactics: professional photography, a walkthrough video, targeted social ad spend, a dedicated property landing page, and syndication to major portals. Where you can, attach an expected reach number from past campaigns rather than a vague promise.
Slide 6, Timeline. A simple week-by-week chart from signing to closing: week one, photography and staging; week two, launch and showings; weeks three through six, offer negotiation and inspection; weeks seven through eight, closing prep. Durations vary by market, so use your recent average.
Slide 7, Next steps and close. State what happens the moment they sign, staging consultation booked, photographer scheduled within 48 hours, listing live within a week. Then close with something direct: “Based on everything we’ve covered, does it make sense to get your home on the market this week?”
How to Prepare for and Run the Appointment
The slides matter less than the conversation around them. Here’s the sequence that turns a good deck into a signed listing agreement.
- Send a pre-listing packet 24 to 48 hours ahead. Include a brief bio, two or three marketing samples, and a preliminary market snapshot. Sellers who’ve already seen your credentials stop asking about them in person, which frees up meeting time for pricing and strategy.
- Open with a two-sentence agenda. Something like: “Today I want to understand what’s most important to you in this sale, then walk you through pricing and my exact marketing plan. Sound good?” This keeps the meeting seller-focused instead of agent-focused from the first minute.
- Ask five discovery questions before you present anything. Why are you selling? What’s your timeline? Have you sold a home before, and how did it go? What matters more to you, speed or top dollar? Is there a number below which this doesn’t make sense to sell? The answers tell you which slides to linger on and which to skip.
- Present pricing as scenarios, not a lecture. Walk through the three-option pricing visual from the CMA slide, and let the seller ask questions before you defend a specific number.
- Have objection responses ready. For “let’s price it higher,” point back to the days-on-market data on overpriced comps. For “I’ll wait for a better market,” ask what specifically they’re waiting for and whether it’s likely to change in their favor. For “your fee is too high,” reframe around net proceeds and marketing reach rather than the percentage itself. For “I need to think about it,” ask what specific piece of information would help them decide today.
- Rehearse before you walk in. A timed five-minute run-through sharpens delivery and cuts the anxiety that makes agents rush through pricing. Deliberate rehearsal measurably improves how confident and clear you sound in high-stakes meetings, and it’s the difference between reading your slides and actually leading the room.
Pro Tip: Decide print versus tablet before you arrive, not at the door. Tablets work well for tech-comfortable sellers and let you pull up a live property microsite; printed leave-behinds work better for sellers who want to flip back to the comps page while they talk it over after you leave.
Customizing Templates Without Breaking Fair Housing Rules
Fast customization comes down to three swaps: one hero image matched to the property’s best angle, one headline variant tailored to the seller’s specific selling point, and three feature bullets rewritten in buyer language. Do this in the first ten minutes of prepping any template.
Turn flat MLS facts into benefit statements. “3 bedrooms, 2 baths” becomes “Room to grow, with a primary suite tucked away from the kids’ rooms.” “Updated kitchen, 2019” becomes “A kitchen built for people who actually cook, finished five years ago.” “0.25 acre lot” becomes “A backyard big enough for weekend cookouts without mowing all Saturday.”
Watch for Fair Housing red flags in your copy: phrases like “perfect for families,” “walking distance to church,” “no wheelchair access,” or “great for empty nesters” all reference protected classes, directly or indirectly, and can create real legal exposure. A tool built for real estate copy, like AgentWrite, flags this kind of wording automatically as it generates your listing descriptions, which catches phrasing agents miss when they’re rushing between showings.
Keep design simple: one font family, a two-color palette pulled from the property’s exterior or finishes, and a single visual accent, a gold line, a subtle icon set, reserved for higher-end listings where sellers expect more polish.
How AgentWrite Speeds Up Your Listing Prep
AgentWrite generates listing descriptions, MLS remarks, social posts, and seller pitch PDFs from one round of property input, in your own writing voice. That output drops straight into your slides: the property description feeds slide three’s feature bullets, the social copy feeds your marketing slide’s sample content, and the seller pitch PDF becomes your leave-behind.
The platform flags Fair Housing wording concerns as it writes, which matters more than most agents realize until they’ve had a listing description flagged by a broker or MLS compliance review after the fact.
Compliant copy generated once, in your voice, and reused across every slide and channel is what actually saves prep time, not writing the same property description five different ways for five different platforms.
…
The Mistakes That Cost Agents the Listing
Most lost listings trace back to a handful of repeatable mistakes, not bad luck or a tough seller.
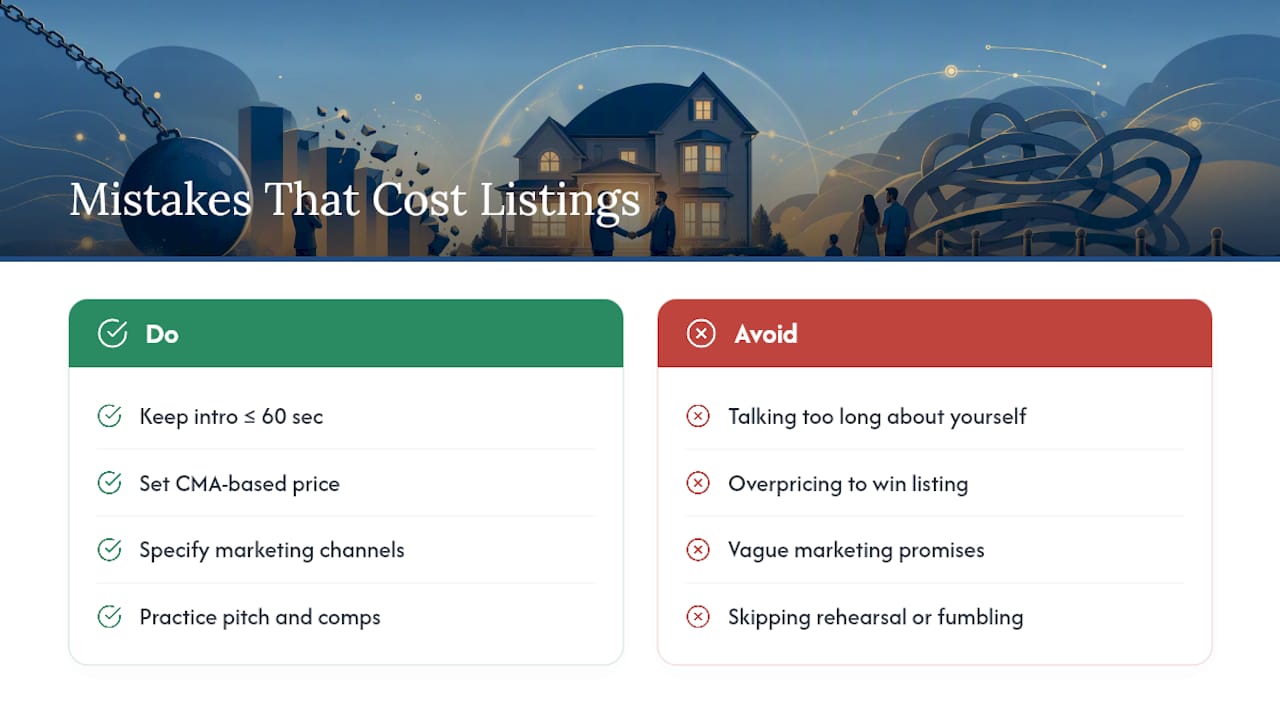
Talking too long about yourself is the most common one. Sellers hired you to sell their house, not to hear your career history. If your “about you” slide runs longer than 60 seconds, cut it.
Overpricing to win the listing backfires almost every time. Agents who inflate their CMA number to please the seller end up with a stale listing, multiple price reductions, and a seller who blames the agent, not the market, for the delay.
Vague marketing promises erode trust fast. “I’ll market your home everywhere” means nothing to a seller who’s heard that line from three other agents this week. Name your actual channels and show sample creative if you have it.
Skipping rehearsal shows. Fumbling through your own comps table or losing your place mid-pitch signals disorganization, exactly the impression you don’t want when asking someone to trust you with their largest asset.
Bringing an investor-style pitch deck to a residential listing is another common miss. Investor decks are built for data-heavy financial audiences; a seller wants a shorter, narrative-driven conversation about their home and their timeline, not a document that reads like a fundraising prospectus.
Finally, closing weakly, or not closing at all, undoes everything the deck did right. If you don’t ask the assumptive close question, plenty of sellers will say “let us think about it” by default, even when they liked everything you presented.
Using Tablets, Video, and Virtual Tours in Your Pitch
A tablet turns a static deck into an interactive conversation. Instead of flipping through printed comps, you can pull up a live map, zoom into a comp’s photos, or scroll a competing active listing in real time, which builds more credibility than a printed number ever will.
Virtual tours and 3D walkthroughs work best on the marketing slide as proof of concept, showing the seller what their own home will look like once you’ve produced similar content for it, using a past listing as an example. Don’t rely on the technology working perfectly in the moment; have a downloaded backup video ready in case the seller’s Wi-Fi is unreliable.

If you’re presenting a property microsite, load it before you arrive and test every link. A broken QR code or a slow-loading page undercuts the “tech-savvy marketer” impression you’re trying to build.
Keep the device secondary to eye contact. Agents who bury their face in a tablet lose the personal connection that actually closes deals; use the screen to support specific points, then look up and keep talking to the seller, not the device.
One practical habit: charge your tablet fully the night before and carry a portable charger. A dead battery mid-presentation is a preventable, embarrassing way to lose momentum in front of a seller you’re trying to impress.
What Actually Wins Listings
The conventional advice treats a listing presentation like a sales brochure: heavy on agent credentials, light on the seller’s actual concerns. That’s backwards. The sellers I’d expect to convert best are the ones who feel heard in the first five minutes, not the ones who sat through a longer bio slide.
What’s overrated is polish for its own sake. A beautifully designed deck with vague marketing language and a padded price estimate loses to a plainer deck with real comps and a specific media plan every time. Sellers aren’t grading your Canva skills; they’re grading whether you understand their house and their market.
What I’d prioritize first: the pricing slide and the marketing slide, in that order. Everything else, your bio, your branding, your timeline chart, is supporting material. Get discovery questions right before you ever open the deck, and let the seller’s answers decide which slides you spend real time on. A presentation tailored in the room beats a perfect deck delivered on autopilot.
— Tyler
Sources
- From online house hunting to e-closing: how home buying has changed · Adobe Blog
- How to rehearse for an important presentation · Harvard Business Review
- Real Estate Pitch Book: Pitch Deck Examples · Waveup
FAQ
What Should Be in a Listing Presentation?
A strong listing presentation covers seven core elements: a cover slide, your credentials, the home’s features, a pricing strategy with comps, a specific marketing plan, a timeline, and a clear next-step close.
How Do You Create a Listing Presentation?
Start with an editable template in PowerPoint or Canva, fill in your property’s photos and data, pull three to five recent comps for the pricing slide, and outline concrete marketing tactics rather than general promises.
What Is an Example of a Listing?
A listing is a property formally offered for sale through an agent, documented with details like address, price, square footage, and features, the same data points that fill your presentation’s comps table and feature slides.
How Do You Win a Listing Presentation?
Lead with discovery questions to understand the seller’s motivation, present pricing as visual scenarios instead of a single number, show a specific marketing plan, and end with a direct assumptive close instead of leaving next steps open-ended.